Trips : How to Disable Windows Services in Windows 11

Trips : How to Disable Windows Services in Windows 11

How to stop windows service in Windwos 11 [Step by Step]

09.12.2022 / Windows 

stop service windows 11

In this guide, we will show you three different methods to disable and stop Services on your Windows 11 PC. Services are a part of the Microsoft Management Console (MMC) snap-in, and at a particular point in time, there are a plethora of such services concurrently running in the background. Each of them handles a specific task or application, without which the associated program might not function correctly. So if these services are of so much significance, why is there a need to disable or stop them?

Well, in some instances an app or software might not function along the expected lines and the root cause of the same could be linked to their particular service. To rectify this issue, you will either have to disable/re-enable their services or stop and then restart them. Likewise, in some cases, a third-party service might conflict with the other system apps and services and hence you might have to disable or stop those buggy services.

Moreover, some of the non-essential services are also known to hog excessive system resources, which leads to high CPU and RAM usage. So in all these scenarios, the best bet is to disable or stop these services on your Windows 11 PC. And in this guide, we will show you how to do just that using four different methods. These include the System Configuration, Services Menu, Task Manager, and Command Prompt. You may refer to the one that is in sync with your requirement.

How to Stop Windows 11 Services via Services Menu

This is the most straightforward and well-known approach that is usually opted for by the users. One downside is that you will only be able to stop/start a service using this method, not disable/enable it. So on that note, let’s get started.

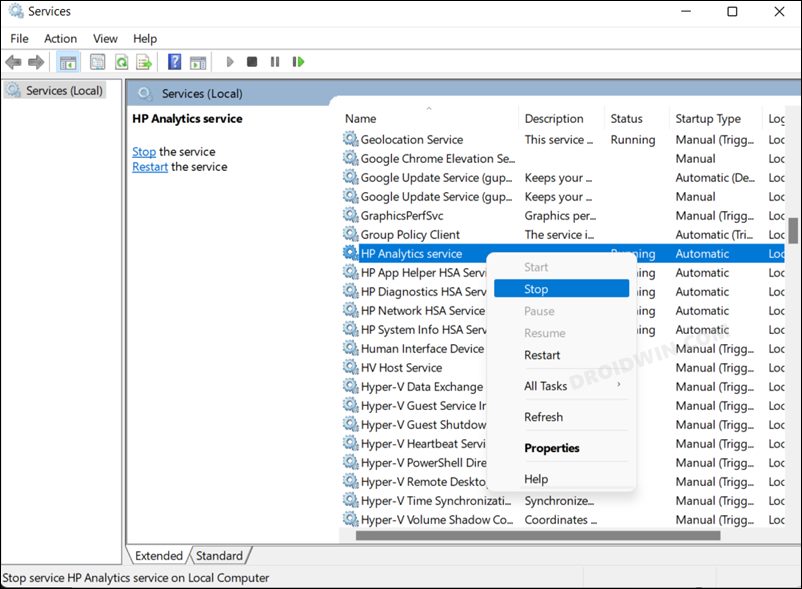
  1. Head over to the Start menu, search Services, and open it.
  2. Then scroll to the desired service, right-click on it, and select Stop.
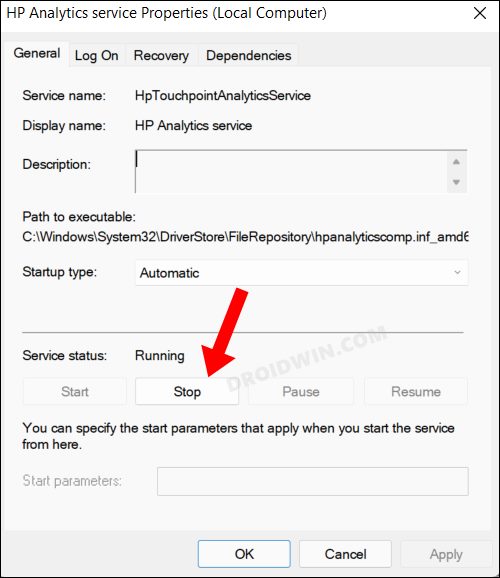
  3. You could also select Properties from the context menu and then click Stop from the subsequent menu.

So these were the two different approaches to stop a service in Windows 11 via the Services app. If at any point in time, you wish to restart that service, just right-click on it and select Start. Or you could also right-click on it, select Properties and then click the Start button.

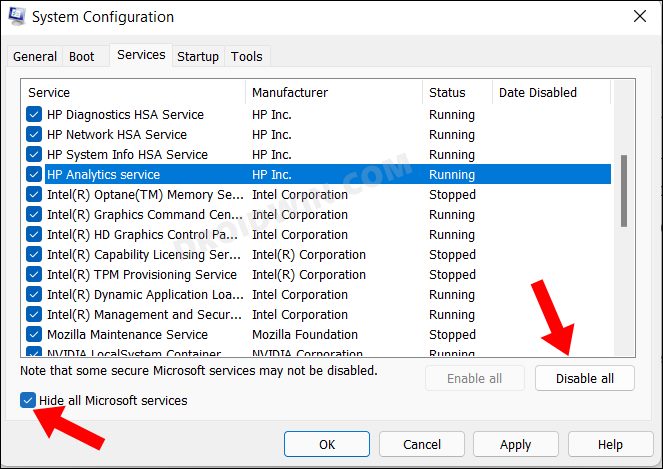
How to Disable Windows 11 Services via System Configuration

This method comes with two big advantages. First off, you could easily disable all the services with just a single click. Likewise, you could also disable all the non-Microsoft Services in just one click, without the need for manual segregation of Microsoft and non-Microsoft services. The downside? Well, it just allows you to disable services and not stop them. So if that’s well and good, then let’s get started.

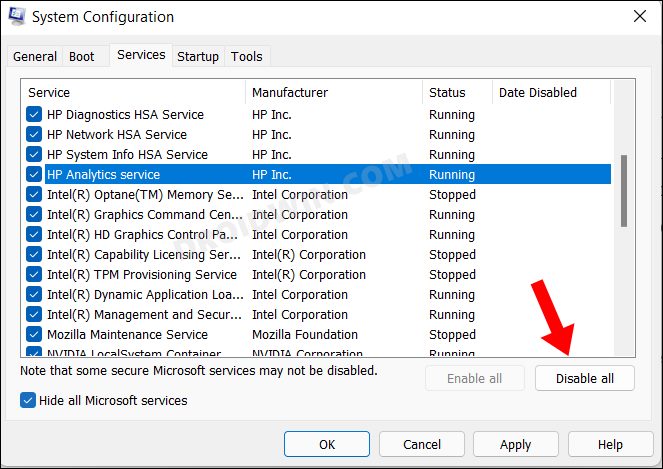
  1. Head over to the Start menu, search System Configuration, and open it.
  2. Then go to the Services tab and click on Disable All to disable all the services.
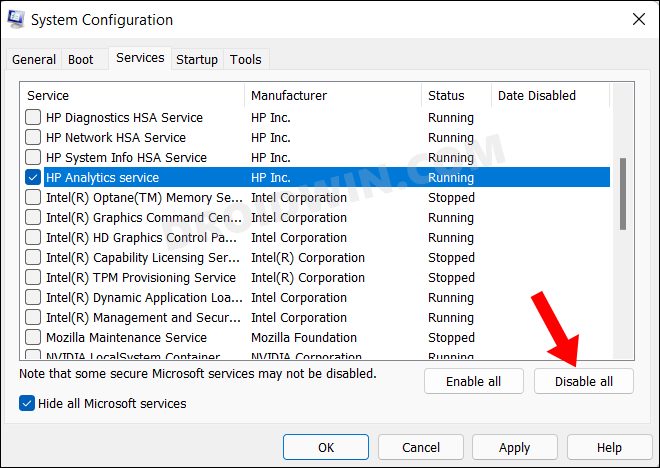
  3. If you wish to disable a single service, then uncheck all the other services and just leave the required service checkmark. Then click on Disable All and that particular service will be disabled.
  4. On the other hand, if you want to disable non-Microsoft Services, then click on Hide All Microsoft Services and then click on the Disable All button.

These were the steps to disable services in Windows 11 via the System Configuration menu. To enable any of the disabled services, just select the desired service/services and click on the Enable All button.

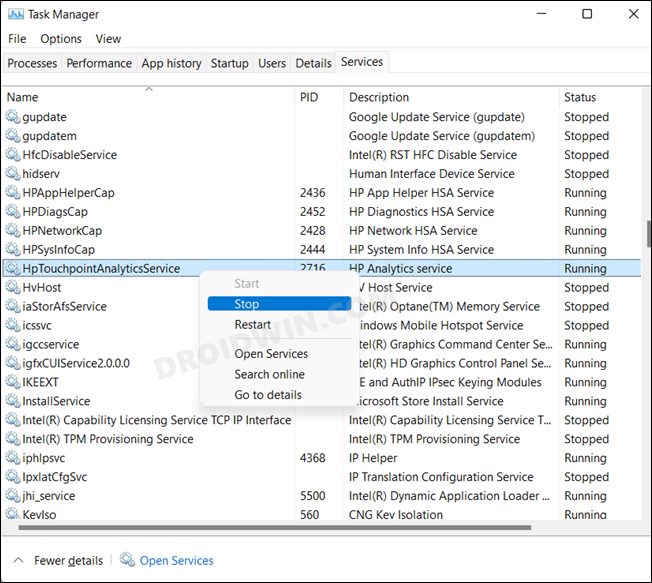
How to Stop Windows 11 Services Using Task Manager

This method is quite easy to execute but on the flip side, you will only be able to stop the services, not disable them. This is because its root lies in the Services menu (that we discussed in Method 1). So whatever drawback and perks this method has, it is the same as the one that the Services app has. So with that in mind, let’s check out this method:

  1. Bring up the Task Manager via Ctrl+Shift+Esc shortcut keys.
  2. Then go to the Services tab, right-click on a particular service, and select Stop.

So this was the short and quick method to stop WIndows 11 services via Task Manager. If at any point in time, you wish to restart the service, then just right-click on the disabled service and select Start.

Stop and Disable Windows 11 Services Via Command Prompt

This is the only method out of the four that supports both the disabling and stopping of services. However, this method is also somewhat time-consuming and technical in nature. Keeping both these points in mind, let’s get started.

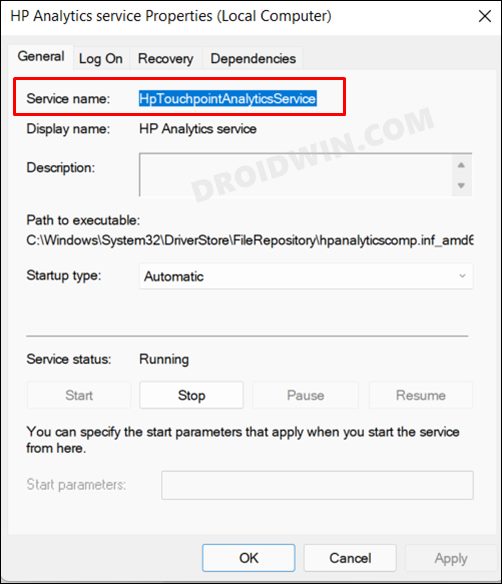
  1. First and foremost, you will have to get hold of the service name that you wish to disable or stop.
  2. For that, launch the Services menu, select the desired service, right-click on it and select Properties. Then note down the name next to Service Name.
  3. As for this guide, we will be taking HP Analytic Service as an example, having the service name HpTouchpointAnalyticsService.
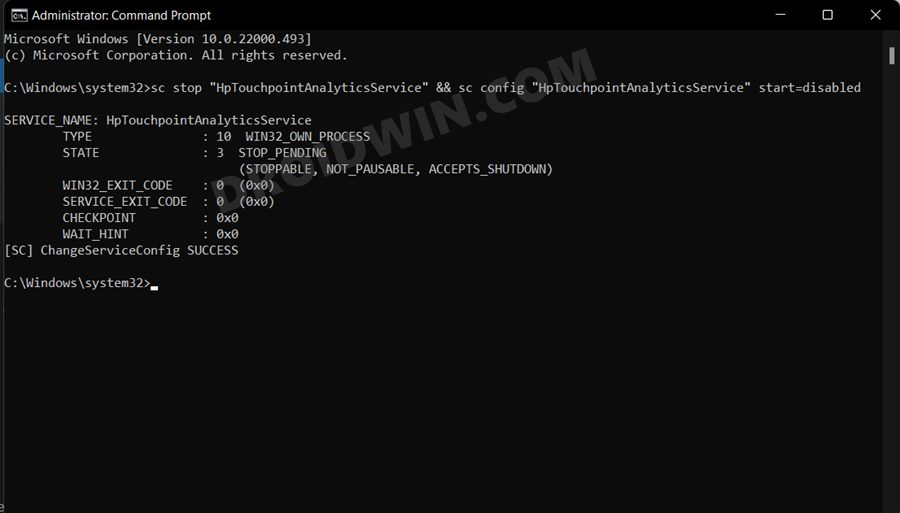
  4. Moving on, head over to the Start Menu, search CMD and launch Command Prompt as an administrator.
  5. Now execute the required command given below, depending on whether you want to disable the service or stop it.

Disable Service via CMD

  1. Execute the below command in the CMD window to disable a service.sc stop „service name“ && sc config „service name“ start=disabled
  2. Make sure to replace the service name from the above command accordingly.
  3. For example, if we want to disable HP Analytic Service, then the command will transform to:sc stop „HpTouchpointAnalyticsService“ && sc config „HpTouchpointAnalyticsService“ start=disabled

Stop Service via CMD

  1. Execute the below command in the CMD window to disable a service.sc queryex Service Name
  2. Make sure to replace the service name from the above command accordingly.
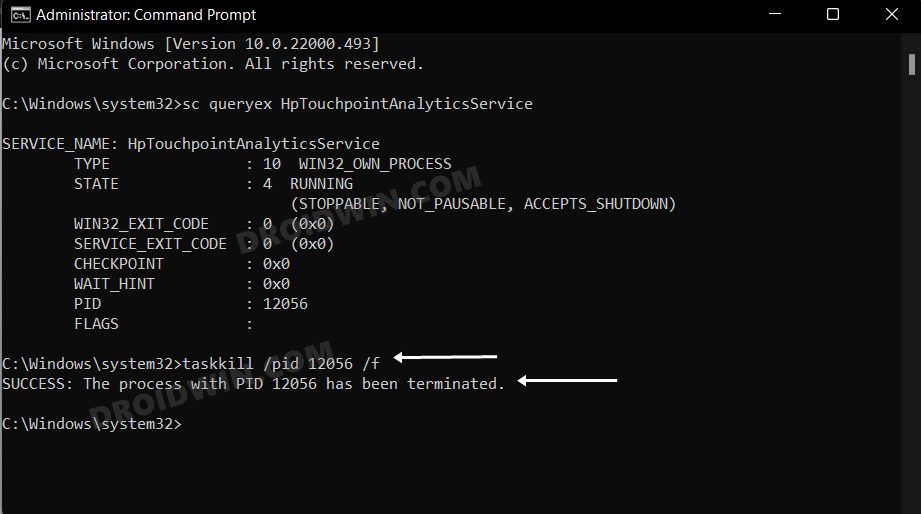
  3. Taking HP Analytic Service as an example, the command in our vase will transform to:sc queryex HpTouchpointAnalyticsServicestop service windows 11
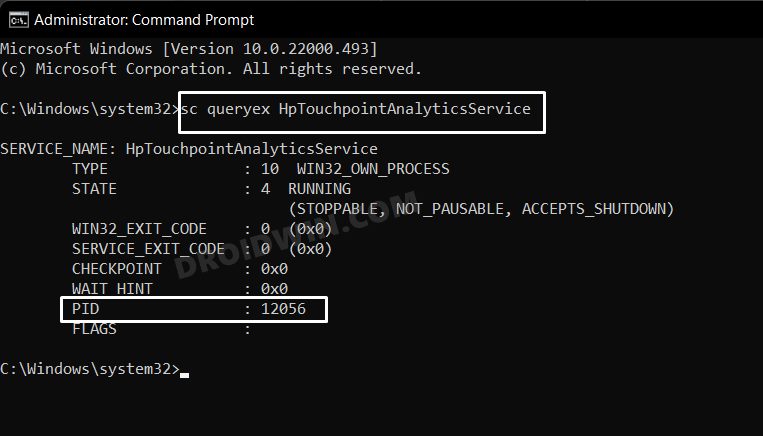
  4. Now note down the PID value and execute the below command [type in the OID value in place of xxxx]:taskkill /pid xxxx /f
  5. For example, the PID value in our case is 12056, so the command will be:taskkill /pid 12056 /fstop service windows 11

So with this, we round off the guide on how you could disable and stop service in Windows 11. We have shared four different methods for the same. Do let us know which one you ultimately decided to settle for. Likewise, all your queries are welcomed in the comments section below.


How to Install Vue CLI on Ubuntu 20.04

How to Install Vue CLI on Ubuntu

How to Install Vue CLI on Ubuntu 20.04


In this article, we’ll explain how to install Vue CLI on Ubuntu 20.04.

Vue.js is an open-source model–view–viewmodel front end JavaScript framework.

A Ubuntu 20.04 installed dedicated server or KVM VPS.
A root user access or normal user with administrative privileges.

Install Vue CLI on Ubuntu 20.04
1 – Keep the server up to date

# apt update -y

2 – Download NodeJS

Download latest stable release of NodeJS.

# curl -sL https://deb.nodesource.com/setup_15.x | sudo -E bash –

3 – Install NodeJS

Next, install the NodeJS using following command:

# apt-get install -y nodejs

4 – Verify the installation

# node -v && npm -v

Output:

v15.9.0
7.5.4

5. Install Vue CLI

Following command will install Vue CLI.

# npm install -g @vue/cli

Verify the installation:

# vue –version

Output:

@vue/cli 4.5.11

6. Create Vue project

# vue create hello-world

You will be prompted to pick a preset. You can either choose the default preset which comes with a basic Babel + ESLint setup, or select “Manually select features” to pick the features you need.

Output:

Vue CLI v4.5.11
? Please pick a preset: (Use arrow keys)
❯ Default ([Vue 2] babel, eslint)
Default (Vue 3 Preview) ([Vue 3] babel, eslint)
Manually select features

Successfully created project hello-world.
Get started with the following commands:

# cd hello-world
# npm run serve

Output:

App running at:
– Local: http://localhost:8080/
– Network: http://192.168.0.106:8080/

Note that the development build is not optimized.
To create a production build, run npm run build.

Navigate to your browser and open http://[server_IP]:8080.

Source  – www.ombadmin.com

Samba AD DC : Configure DC

Configute Samba Active Directory Domain Controller. This example configures on the environment bellow. Domain name : SMB01 Realm : SRV.WORLD Hostname : smb.srv.world
[1]Install some packages.
root@smb:~# apt -y install samba krb5-config winbind smbclient # set Realm
+––––––+ Configuring Kerberos Authentication +––––––+ | When users attempt to use Kerberos and specify a principal or user name | | without specifying what administrative Kerberos realm that principal | | belongs to, the system appends the default realm. The default realm may | | also be used as the realm of a Kerberos service running on the local | | machine. Often, the default realm is the uppercase version of the local | | DNS domain. | | | | Default Kerberos version 5 realm: | | | | SRV.WORLD________________________________________________________________ | | | | <Ok> | | | +–––––––––––––––––––––––––+ # specify the hostname
+––––––+ Configuring Kerberos Authentication +––––––+ | Enter the hostnames of Kerberos servers in the SRV.WORLD Kerberos | | realm separated by spaces. | | | | Kerberos servers for your realm: | | | | smb.srv.world____________________________________________________________ | | | | <Ok> | | | +–––––––––––––––––––––––––+ # specify the hostname
+––––––+ Configuring Kerberos Authentication +––––––+ | Enter the hostname of the administrative (password changing) server for | | the SRV.WORLD Kerberos realm. | | | | Administrative server for your Kerberos realm: | | | | smb.srv.world____________________________________________________________ | | | | <Ok> | | | +–––––––––––––––––––––––––+
[2]Configure Samba.
# rename or remove the default config file
root@smb:~# mv /etc/samba/smb.conf /etc/samba/smb.conf.org
root@smb:~# samba-tool domain provision
# specify Realm
Realm [SRV.WORLD]: SRV.WORLD
# specify Domain name
Domain [SRV]: SMB01
# Enter with default because it sets DC
Server Role (dc, member, standalone) [dc]:
# Enter with default because it uses Built-in DNS
DNS backend (SAMBA_INTERNAL, BIND9_FLATFILE, BIND9_DLZ, NONE) [SAMBA_INTERNAL]:
# confirm DNS setting and Enter if it’s OK
DNS forwarder IP address (write ‘none’ to disable forwarding) [10.0.0.10]:
# set admin password
# Do not set trivial password, if you input it, configuration wizard shows error and stops
Administrator password: Retype password: Looking up IPv4 addresses Looking up IPv6 addresses No IPv6 address will be assigned Setting up share.ldb Setting up secrets.ldb Setting up the registry Setting up the privileges database Setting up idmap db Setting up SAM db Setting up sam.ldb partitions and settings Setting up sam.ldb rootDSE Pre-loading the Samba 4 and AD schema Adding DomainDN: DC=srv,DC=world Adding configuration container Setting up sam.ldb schema Setting up sam.ldb configuration data Setting up display specifiers Modifying display specifiers Adding users container Modifying users container Adding computers container Modifying computers container Setting up sam.ldb data Setting up well known security principals Setting up sam.ldb users and groups Setting up self join Adding DNS accounts Creating CN=MicrosoftDNS,CN=System,DC=srv,DC=world Creating DomainDnsZones and ForestDnsZones partitions Populating DomainDnsZones and ForestDnsZones partitions Setting up sam.ldb rootDSE marking as synchronized Fixing provision GUIDs A Kerberos configuration suitable for Samba 4 has been generated at /var/lib/samba/private/krb5.conf Once the above files are installed, your Samba4 server will be ready to use Server Role: active directory domain controller Hostname: smb NetBIOS Domain: SMB01 DNS Domain: srv.world DOMAIN SID: S-1-5-21-2545056461-174665597-1916133120 root@smb:~# cp /var/lib/samba/private/krb5.conf /etc/
root@smb:~# systemctl stop smbd nmbd winbind
root@smb:~# systemctl disable smbd nmbd winbind
root@smb:~# systemctl unmask samba-ad-dc
Removed /etc/systemd/system/samba-ad-dc.service.
root@smb:~# systemctl start samba-ad-dc
root@smb:~# systemctl enable samba-ad-dc # show status
root@smb:~# smbclient -L localhost -U%
Domain=[SMB01] OS=[Windows 6.1] Server=[Samba 4.5.8-Debian] Sharename Type Comment ––– –- ––- netlogon Disk sysvol Disk IPC$ IPC IPC Service (Samba 4.5.8-Debian) Domain=[SMB01] OS=[Windows 6.1] Server=[Samba 4.5.8-Debian] Server Comment ––– ––- Workgroup Master ––– ––- WORKGROUP
[3]Confirm doman level and add a Domain user.
# confirm doman level
root@smb:~# samba-tool domain level show
Domain and forest function level for domain ‘DC=srv,DC=world’ Forest function level: (Windows) 2008 R2 Domain function level: (Windows) 2008 R2 Lowest function level of a DC: (Windows) 2008 R2 # add a donain user
root@smb:~# samba-tool user create debian
New Password:   # set password
Retype Password:
User ‘debian’ created successfully

Installing the snap in writable mode

The snap is by definition read-only, but some times it’s useful to poke at the contents of it to see what’s going on. If we want to do that, there are some hoops we can jump through to get there. Note that this is not recommended for production use. The snap won’t be as secure and will no longer update if you do this. This is handy for development/experimentation, nothing more.

I’m runnning these commands on a fully up-to-date Ubuntu 18.04, they are untested elsewhere. I know from experience that this does not work with home disk encryption (ecryptfs), but full disk encryption is fine.

Download the snap in question

This will download both the snap and the store assertion (store signature for the snap). You can optionally specify the channel, it will default to using stable:

$ snap download nextcloud [--channel=14/candidate]

Unpack the snap

We’re doing this so that we can modify it (otherwise we wouldn’t be able to write to the squashfs image):

$ unsquashfs nextcloud_10079.snap

That unpacks by default to a directory named „squashfs-root“.

Install the snap in read/write mode

We can use snap try to install the snap in read/write mode now that we’ve unpacked it:

$ sudo snap try squashfs-root

Use nextcloud and tinker away

The snap will fire up after the snap try command and start listening on port 80, so you can just visit http://localhost in your browser to create an admin user and get up and running. The Nextcloud sources are in squashfs-root/htdocs/, although note that the config being used is not in there, but in /var/snap/nextcloud/current/nextcloud/config/.

Remove nextcloud when done

When you’re satisfied with your tinkering, you can uninstall the Nextcloud snap like normal, getting rid of the config and all data:

$ sudo snap remove nextcloud
error: Content is protected !!